Do you see those printed t-shirts and hoodies that speak volumes and say, I gotta have that? If you have an entrepreneurial mind, I bet you wondered how you could make that myself. Wonder no more.
This article will answer all these questions and many more. Brace yourself; it’s going to be a long read. But at the end of it, you might as well think of starting your own printed T-shirts business. Let’s get started, shall we?
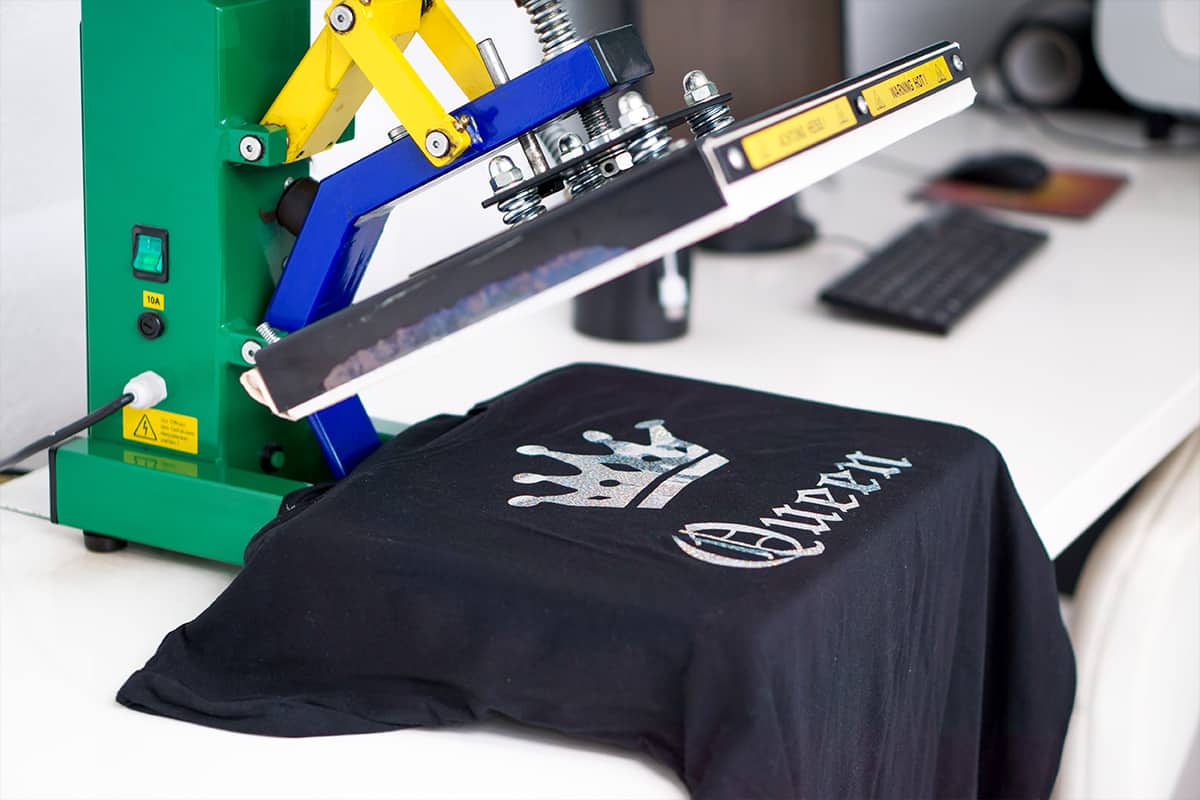
What Do You Need To Make A Printed T-Shirt?
If you are looking to start printing t-shirts with as little investment as possible, then follow these steps. First, of course, you will need a blank t-shirt. Blank t-shirts suitable for printing are available any Joann Fabrics, Michael’s or Wal-Mart. You won’t need access to wholesale t-shirt providers until you increase your production.
Next, you will need a heat press that is capable of reaching temperatures of 400° F. Reasonably priced heat presses are available on Amazon, check prices here. I wouldn’t spend a whole lot of money on a heat press until you know that this is something you want to pursue on a larger scale.
Finally, you will need a plastisol heat transfer with your design on it. I use a local screen printer to purchase my plastisol transfers. There are many heat transfer sellers available online, but I tend to keep it local just in case any problems arise.
We’ll discuss how to make your design as well but first let’s understand how you get the end product.
Here are the basic steps to creating your first custom printed t-shirt:
• Start with a blank t-shirt in whatever color or style you choose. 100% cotton t-shirts work best, but you can use pretty much any blend, just stay away from nylon.
– Heat up your press to the manufacturers recommended settings. i.e., 325°F for 8 seconds.
• Place your t-shirt on the bottom platen of the heat press.
• Next, place your plastisol heat transfer with the printed side down.
– Starting out alignment is the most difficult part. A general rule of thumb is to place the top of the design three fingers from the bottom of the collar for full front prints.
– Lower the top of the press onto the transfer and lock it in place for the recommended time, when the timer goes off release the top of the press and immediately peel off the transfer.
– That’s it, you have created your first custom t-shirt.
Tip
Although not necessary, you could remove the transfer paper and in its place use a Teflon sheet and then reheat-press for 2-3 seconds to remove any excess adhesive powder residue. This is not a required step because after the first wash the adhesive powder residue will be removed.
Which Fabrics Work Best With Plastisol Transfers?
The question of fabrics is very important. Not all fabrics can withstand the amount of heat required to transfer the prints. Chiffon and Nylon, for example, will just melt within a second with the high temperatures required. Other than that, some garments won’t allow the design to stick no matter how much heat or pressure you use. Finally, some will stick but only for a few months or even weeks and then the pattern comes out.
100% cotton and 100% polyester work fantastic. Fabric with 50% cotton and 50% polyester will also work fine. The difference between a pure material and a 50/50 blend is in the amount of moisture used to hold the fibers together. Pure fabrics hold more moisture than a mixture of each.
Tip
When dealing with 100% poly or cotton, heat-press the material first before applying the plastisol design for a couple of seconds. This removes the excess moisture and allows the design to stick better and for a longer period. If you decide not to preheat your 100 % cotton or polyester fabrics, then press them for longer until the steam stops. Twelve seconds in a 325 degrees hot press would be ideal.
When dealing with 100% polyester, 50/50 blends and polyester t-shirts with textures and patterns dyed on the fabric you need to look out for dye migration. It doesn’t always happen while you are pressing the shirts, it will usually happen during the next 24 hours or after the first wash with warm water and detergent. The fix for this problem is to use 100% cotton shirts or orders transfers that are made to block dye migration. Normally known as subli-block.
How They Create Plastisol Transfers
Plastisol transfers are available for order online and in most t-shirt printing shops. You can give them your design ideas and a customized message, but this works best for large orders. Otherwise, for a t-shirt or two, online shops might over-charge you due to set-up costs.
So how does a print shop make a plastisol transfer? The procedure is quite simple but does require a few specialized items.
Required materials
• Hot peel paper to act as the carrier for your heat transfers.
• A 110/150 mesh screens.
• Dual edge strip coater. This needs to have a rounded edge and a thin edge for even layers of paint coating.
• A transfer adhesive powder.
• Opaque plasti-solvent ink.
Procedure
Unless you are going to try this at home, you won’t need the minute details of screen printing. Basically, the printing shop will set up a screen with your design and start printing just like they are printing shirts. Instead of printing on fabric they will print on the hot peel paper. After printing the design onto paper and curing it with a flash dryer, the adhesive powder is applied. The adhesive powder is the key to plastisol heat transfers. Without it, your transfer would not stick very well, or durability would suffer. They then shake off the excess powder and do a final cure. Your print is not ready to be transferred on to a blank t-shirt.
Tips
For anyone trying this at home that doesn’t want to invest $1000s into a dryer, your heat press will work. Just make sure not to close it all the way. You can place the wet transfer underneath the heat platen for a few minutes to get it to cure.
To get the best out of your heat transfers your designs will need to make sure your designs have a few attributes. You want all your lines to be a minimum of 1pt of thickness. One of the issues with heat transfers is that fine details will be lost. Also, you will need to convert all of your text to curves. Although most t-shirt printers will have access to all types of fonts if you have an exact font you want to use you will need to convert before sending the design. If you don’t, you will likely incur design fees.
Adding a twist to your designs
1. If you need to add a little bling to your heat transfers most screen printers are able to print your heat transfers using glitter ink. This sparkly effect will make your designs stand out from all the others.
2. Glow in the dark effect. To achieve this effect, you only need to change the ink. There is a type of ink called “glow in the dark ink”. Ensure that it is a plastisol ink. And just like the other plastisols, the design can be safely stored for use on future Plastisol Heat Transfers.
3. Distressed or vintage appearance. All the screen printers will be able to add a distressed look to your design for just a few extra dollars. If your design skills are decent, this is a simple process that can be achieved with Adobe Illustrator or Photoshop.
Advantages of Using Plastisol Heat Transfers over Direct Fabric Printing
• The major advantage of Plastisol Heat Transfers is that you can make the hot peel paper designs and use them for years as long as you keep the papers in a cool and dry place, your designs and ink will remain intact.
• Plastisols get the job done faster. With ready designs, it takes only 10-15 seconds to have a fully printed garment.
• Plastisols are cheaper than direct printing.
• Transfers are good for onsite printing. You only need to carry the prints and a mobile heat press.
• They are also a better alternative for small and hard-to-work-with garments like hats and infant sized garments.
Disadvantages
• A key disadvantage, when compared to screen printing, is that the ink design is not embedded into the fabric. Instead, it is left as a layer on top of the fabric. Although this layer will last for over five years in excellent condition, it is subject to wear over time. This also depends on how you take care of these fabrics. For example, washing them on high heat reduces their shelf life.
• There is a thin line between adequately cured plastisols and over-cured ones. If you over-cure, then your design will crack after the first wash. This becomes a disadvantage only if you are to make the plastisols yourself.
The Bottom Line
I hope that this article has answered some, if not all, plastisol heat transfer questions. However, let me mention that these transfers are not only limited to t-shirts. You can use them on hoodies, shirt sleeves, hats, towels, scarfs, and any garment that you can think of as long as the material is either cotton, polyester, or a 50/50 blend. They are easy to do and a quick way to earn some income.
Check out more methods of creating t-shirts: